Here are the items I’m working with today:
Respirator: 3M Versaflo TR-300N+ HIK – https://amzn.to/42dZm84 (affiliate link)
Standard earmuffs for Versaflo: 3M PELTOR M-985 – https://amzn.to/4pJL213 (affiliate link)
Less expensive hard hat style earmuffs that are supposed to also fit Versaflo: 3M PELTOR X2P3 – https://amzn.to/4pYEV9w (affiliate link)
Headphones I like: 3M Worktunes Connect+ AM/FM w/bluetooth – https://amzn.to/3VEevfm (affiliate link)
A standard size and a small size phillips screwdriver.
A list of Versaflo accessories from 3M.
Optional: 3D printer, PETG filament and the files from step 4
Disclaimer: Versaflo and Worktunes are 3M products, 3M is not in any way affiliated with this project. I’m using this respirator in my personal workshop. I have no idea if this is a kosher mod to the versaflo system in an industrial setting.
Step 1: That Looks Suspiciously Similar…


As far as hearing protection in the workshop, I really like my 3M worktunes, but the helmet portion of the versaflo makes it impossible to use over the head style earmuffs.
Or does it?!
While spending way too much time looking for a worktunes style headphone system that fits on a hardhat, I noticed that all the 3M brand headphones looked like they had the same style ear cup attachment clip…
No way, it can’t be that simple… can it?
Only one way to find out for sure!
Turn the earcup 90 degrees, pull on the clip with two fingers to unsnap it. Repeat for the worktunes. Take clip from orange earmuffs, clip onto worktunes and…
Holy Frankenstein’d headphones, it worked!
Yeah, yeah, yeah, we’ll have to do something with the wire, but IT WORKED!
Step 2: Big Helmet


Full speed ahead, time to get the earmuffs mounted to the versaflo!
(To install the brackets onto the helmet I stuck with the OEM configuration since I’ve never done it before and the worktune earcups are larger which might make it more cumbersome to finaggle the brackets into place.)
With the headphone mounting tab forward toward the visor, align it with the two existing indents in the helmet. There is a left and right, but its easy to figure out because they really only go on one way since it has to fit over the curve of the helmet (picture 3).
To help the screws go in easier, open up the mounting hole with the tip of the screwdriver. This will make it easier to “break through” the thin cover and thread into the mounting boss on the inside of the helmet.
Use the supplied screws and gently thread them in. The screws are cutting threads into the plastic as they go so be very carful not to overtighten them and strip them out.
Repeat for the other side and done!
There are two “stowed” options for when the earmuffs aren’t in use, 3M says don’t leave it in the middle position for too long though or it may mess with the wire tension overtime.
Next, upgradde time!
Step 3: Upgradde!


This headphone “hack” probably works with most 3M earphones / earmuffs but I’ve only tested it with the three I have here.
Alright, time to fully disassemble the Worktunes (I switched to my old pair just in case I screwed something up 😅). Do the unsnap trick from step 1 and then remove the three tiny screws on the headband cap to free the wire.
Unsnap the plain boring earmuffs from the Versaflo, snap in the new NOT boring AM/FM bluetooth fancy headphones and route the wire under the head support straps.
It’s done – Bam! Voila! All that jazz, it works and it’s awesome! I have my tunes again while using my new fancy respirator, happy dance!
Step 4: Can’t Make It Better-er Until You Actually Do It


So I couldn’t leave well enough alone… I know, big surprise…
Routing the wire under the helmet support straps works, but I think there’s a better way. There is a small channel around the back of the helmet that looks perfect for tucking a wire into. There just needs to be something to hold it in place.
At first I was tempted to just hot glue it… But that might be a little too redneckified in this instance… So I jumped into Autodesk Fusion and whipped up some custom wire clips to hold the worktunes wire into the versaflo helmet. They slide into the tapered section between the head support and helmet and have a groove in the middle to hold the wire.
I did a couple test prints and eventually settled on the simpler design. The final versions were printed on Bamboozler my X1C in matte gray Zyltech rapid PETG.
All the typical file type flavors are attached here if you want to print them or take a go at modifying them.

Step 5: 3Meggaverse


Danger! Danger! Mini Rant Warning!!!
I don’t know if you’ve ever tried to decipher the 3M meggaverse, maybe it’s just me, but I find most of their documentation to be really confusing and repetitive. Finding what actually fit this helmet seemed way more complicated than it needed to be. There were multiple documents that seemed to have similar info, but not quite all the same info.
And for example, if you look at the printout in the supplies section, technically both the orange and the yellow sets of earmuffs should have fit according to the list of versaflo accessories. But they don’t. The less expensive ones have the right mounting holes, but the wire hanger is slightly different and they have the wrong back spacer doohicky.
The backspacer doohicky, part number M-984, is interchangeable with the other helmet mount, but seems basically impossible to find. The one place I did find it in the US charged more for just a set of the doohicky’s than what I paid for the set of orange “official” versaflo earmuffs.
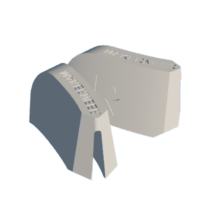
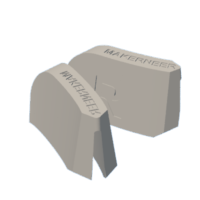
So here’s all the images of versaflo earmuffs next to normal hardhat earmuffs that I wish I’d had access to while trying to figure out what actually fit the versaflo respirator!
TLDR: The versaflo stuff is actually different than normal hard hat mounted earmuffs.
Step 6: That’s a Wrap!

So you’re probably wondering how much did all this actually cost. Together, the worktunes and the orange versaflo earmuffs ran me just under $140 in 2025 US dollars (I bought the worktunes when they were on sale).
But here’s the deal, I needed a new set of worktunes and I needed my new respirator to have hearing protection. So this purchase was going to happen anyway. I’m just thrilled the “what if” actually worked out this time!
Also, since the 3M ear cup clips are interchangeable, I was able to put the original Versaflo earmuffs onto the Worktunes headband so I have another pair of passive earmuffs, win!
While editing, I also noticed that there’s one of my older instructables visible in the background, made me smile! 😎
Alright, that’s it for this one, thanks for hanging out!