Step 1: Creating the Prototype

Even before I started the CAD model, I created a scale model of the castle to solidify the design I had in my head. Despite not considering the steps it would actually take to build the castle while building this prototype, it helped me finalize the design and look of the castle. After creating this validation prototype, I moved on to figuring out how to make this castle a reality.
Step 2: CAD Model


The castle is made up of five main subassemblies: 2 pillars, the middle section, the left middle section, and the right middle section. The pillars and left/right middle sections are identical on both sides. When designing this CAD model, I made sure to consider that actors would be standing on top of the castle. I also made sure to make all the parts different colors to be able to easily differentiate between each part.
After I finalized the CAD model, I created a set of instructions with dimensions and pictures using Google Docs to help me build the castle in real life without the need to refer back to my laptop several times (since I am working in a dusty environment). The steps onwards will guide you on how you can make the castle in real life, like I did. Also note the slight difference in the images of the CAD models above. The image on the very left had some slight changes to the middle section because I decided to reuse platforms we already had built in the shop that were the perfect size. But for you at home, the images on the right would be the most relevant because they build the middle section from scratch.
Step 3: Subassembly Parts List

These are the names of the subassembly framing (the framing that makes up the five main subassemblies), which will be referred to in the full castle assembly instructions. Also note, Part G is just 2x4s that add additional support to the bottom of the center units.
Step 4: Pillar Support Dimensions: Part A

This section provides the dimensions of the pillar support and describes how to build it.
Instructions:
- Cut three 2x4s to 48 inches.
- Cut two 2x4s to 27.314 inches.
- Cut the previous 2×4 at a 67.5॰ angle using the miter saw.
- Measure the short side of the 2×4, it should be 24 inches.
- Attach the vertical stud to the previous 2×4. Make sure that the edge of the stud sits flush with the short corner of the 2×4.
- Repeat 16 times.
Step 5: Pillar Floor Joist Dimensions: Part B

This section provides the dimensions of the pillar floor joist and describes how to build it.
Instructions:
- Cut eight 2×4 to 27.314 inches.
- Cut each 2×4 at a 67.5॰ angle using the miter saw.
- Measure the short side of the 2×4, it should be 25.657 inches.
- Connect all eight 2×4 to make an octagon.
- Cut three 2×4 to 61.941 inches.
- Cut six 2×4 to 18.142 inches.
- Cut six 2×4 to 9.828 inches.
- Assemble in the pattern as shown in the exploded view above.
- Repeat 2 times.
Step 6: Center Unit Front Panel Dimensions: Part C

This section provides the dimensions of the center unit front panel and describes how to build it.
Instructions:
- Cut two 2x4s to 62 inches.
- Cut four 2x4s to 36.75 inches.
- Attach the 2×4 as shown in the exploded view above and space out each stud 18 inches apart.
- Repeat 4 times.
Step 7: Center Unit Floor Joist Dimensions: Part D

This section provides the dimensions of the center unit floor joist and describes how to build it.
Instructions:
- Cut two 2x4s to 62 inches.
- Cut four 2x4s to 42.188 inches.
- Attach the 2×4 as shown in the exploded view above and space out each stud 18 inches apart.
Step 8: Left and Right Unit Back Dimensions: Part E

This section provides the dimensions of the left and right unit back and describes how to build it.
Instructions:
- Cut two 2x4s to 81.03 inches.
- Cut each 2×4 at a 135॰ angle using the miter saw.
- Measure the short side of the 2×4, it should be 77.03 inches.
- Cut four 2x4s to 36.75 inches.
- Attach the 2×4 as shown in the exploded view above and space out each stud 18 inches apart.
- Repeat 2 times.
Step 9: Left and Right Unit Floor Joist Dimensions: Part F

This section provides the dimensions of the left and right unit floor joist and describes how to build it.
Instructions:
- Cut one 2×4 to 81.03 inches.
- Cut the 2×4 at a 45॰ angle using the miter saw and cut wood vertically.
- Measure the short side of the 2×4, it should be 79.003 inches.
- Cut four 2x4s to 42.188 inches.
- Cut one 2×4 to 62 inches.
- Attach the 2×4 as shown in the exploded view above and space out each stud 18 inches apart.
- Repeat 2 times.
Step 10: Center Unit Support Dimensions: Part G

This section provides the dimensions of the 2×4 supports at the bottom of the center units and describes how to build them.
Instructions:
- Cut one 2×4 to 38.19 inches using the miter saw.
- Repeat 6 times.
Step 11: Front Stairs Dimensions: Part H

This section provides the dimensions of the front stairs and describes how to build them.
Instructions:
- Cut twenty-two 2x4s to 28.875 inches using the miter saw.
- Cut out a 60×32-inch sheet of plywood using the table saw.
- Cut the 60×32-inch sheet of plywood following the stair stringer dimensions above with an 8-inch rise and 15-inch run using the circular saw.
- Repeat steps 2-3 three times.
- Attach the three stringers together using the 2x4s cut out in step 1. Place three of them on the bottom of each side, then place them at the front and back of each run.
Step 12: Rear Stairs Dimensions: Part I

This section provides the dimensions of the rear stairs and describes how to build them.
Instructions:
- Cut eleven 2x4s to 28.875 inches using the miter saw.
- Cut out a 60×32-inch sheet of plywood using the table saw.
- Cut the 60×32-inch sheet of plywood following the stair stringer dimensions above with an 8-inch rise and 15-inch run using the circular saw.
- Repeat steps 2-3 two times.
- Attach the two stringers together using the 2x4s cut out in step 1. Place three of them on the bottom of each side, then place them at the front and back of each run.
- Repeat 2 times.
Step 13: Pillar Assembly: Uses Parts a and B

This section provides instructions on how to assemble the previous parts together to form the castle pillars.
- Create an octagon using Part A.
- Place Part B on top of the octagon formed.
- Repeat 2 times to create both pillars.
Step 14: Left Unit Assembly: Uses Parts C, E, F, G

This section provides instructions on how to assemble the previous parts together to form the left unit of the castle.
- Place Parts C and E parallel to one another and attach them using x2 Part G.
- Place Part F on top of the rectangular prism.
Step 15: Right Unit Assembly: Uses Parts C, E, F, G

This section provides instructions on how to assemble the previous parts together to form the right unit of the castle.
- Place Parts C and E parallel to one another and attach them using x2 Part G.
- Place Part F on top of the rectangular prism.
Step 16: Center Unit Assembly: Uses Parts C, D, G

This section provides instructions on how to assemble the previous parts together to form the center unit of the castle.
- Place x2 Part C parallel to one another and attach them using x2 Part G.
- Place Part D on top of the rectangular prism.
Step 17: Full Castle Assembly

This section provides instructions on how to assemble the previous assemblies together to form the full castle.
- Lay out the units as shown in the image above and connect them together.
Now, you have fully built the castle’s framing. All that is left to be done is to cover everything with the appropriately sized plywood. I would do this by placing the plywood in front of the sections that need to be covered and using a pencil to outline where it needs to be cut. Alternatively, you could measure each section and create an outline based on that.
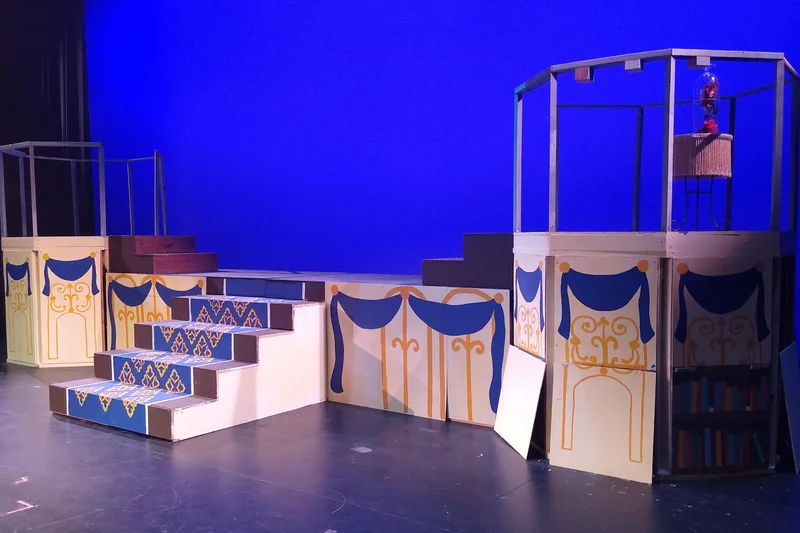
Step 18: Building It in Real Life


Following these exact steps, I built the castle, and the team painted it to make it look like a castle from Beauty and the Beast. We also decided to add custom railing to the top of the castle to make it look more castle-like and to prevent people from falling. I hope you guys enjoyed reading this process as much as I did while building it! I also included a PDF version of the instructions if you ever want to build this yourself!