Supplies
In order to bring Wall-E to life, here are all the supplies you’d need
- 3D printed Wall-E body and treads (STL/f3d files below)
- XIAO ESP32-C3
- You can use a regular ESP32 but I used this specifically as I thought it would be tough to fit all the electronics within the body
- L298N Motor driver
- 7.4V 18650 Lithium ion Rechargeable Battery
Step 1: 3D Printing

Printing this required tons of retries and testing before I got the final print. This was actually a remix of the 3D Wall-E designed by Ezazul Haque on grabcad, you can find the original design here. Luckily enough Ezazul designed it in fusion and made the f3d file available, so it was super easy remixing it on fusion to create a 3D printable design.
After remixing it, and resizing it so that it could fit the TT yellow gear motors, electronics and designing the treads properly, I printed them using translucent PETG, as I wanted to paint it later on. I also printed the treads using 95A Grey TPU, for a nice and flexible tread, I like how it turned out but I feel it’d be better if I made the treads a bit more thinner.
You can use the provided 3mf Bambu Studio file to 3D print the parts of Wall-E directly.
Wall-E
Attachments

Step 2: Painting
For painting Wall-E, I used simple acrylic paint. Luckily it had just the right colors and if you want to get the exact same acrylic paint set, you would find it here. Apart from using the obvious yellow and slightly yellow ochre, feel free to make the paint slightly messy and make Wall-E look a bit dirty like he did in the movie. I even spread some black paint by flicking my paint brush as shown in the video, to make Wall-E look a bit more messy.
Overall after a couple layers of paint later, I was quite glad with how it turned out to be. Next thing you’d want to do is dry the paint, now this is the hardest part of this project to be honest. For drying, I directly used a hair dryer, and it seemed to work well, but after a while I’d find the paint still wet, even if it would initially feel dry. See the thing is, after every layer of paint you must dry it, otherwise, after you’re done painting you would continue to only dry the topmost layer of paint, which eventually would again get wet after some time. That’s where I was stuck as well, as the paint was somehow just not drying, however after almost a week of drying it multiple times with my hair dryer, it feels much more dryer now. Though it does still feel a bit sticky to touch.
Step 3: Electronics and Code

This step is where Wall-E comes to life, we’ll be using some super simple components to build this. In case you’ve worked with L298N before, you will know how easy it is to build a circuit to control 2 motors while also powering our MCU.
Now this is a pretty simple circuit that you’d normally find for a RC tank as well. Using the L298N, it is super easy to interface, and work with TT Gear motors. Attached with this you will find the pin diagram and mapping table to easily create your circuit.
| Component | Pin | Connected To |
|---|---|---|
| Battery Pack (2×18650, series) | + | L298N +12V |
| Battery Pack (2×18650, series) | – | L298N GND |
| L298N Motor Driver | +12V |
Battery + |
GND |
Battery – and XIAO GND |
|
+5V |
XIAO 5V/VBUS |
|
IN1 |
XIAO D0 |
|
IN2 |
XIAO D1 |
|
IN3 |
XIAO D3 |
|
IN4 |
XIAO D4 |
|
OUT1 / OUT2 |
DC Motor A terminals | |
OUT3 / OUT4 |
DC Motor B terminals |
Once all of this is done, you are ready to upload your Arduino code to the XIAO ESP32C3. You can find the code below.
Please convert it to a .ino, I don’t know why it was not uploading when I tried to upload the Arduino file, so I just ended up uploading it as a txt file.
Attachments
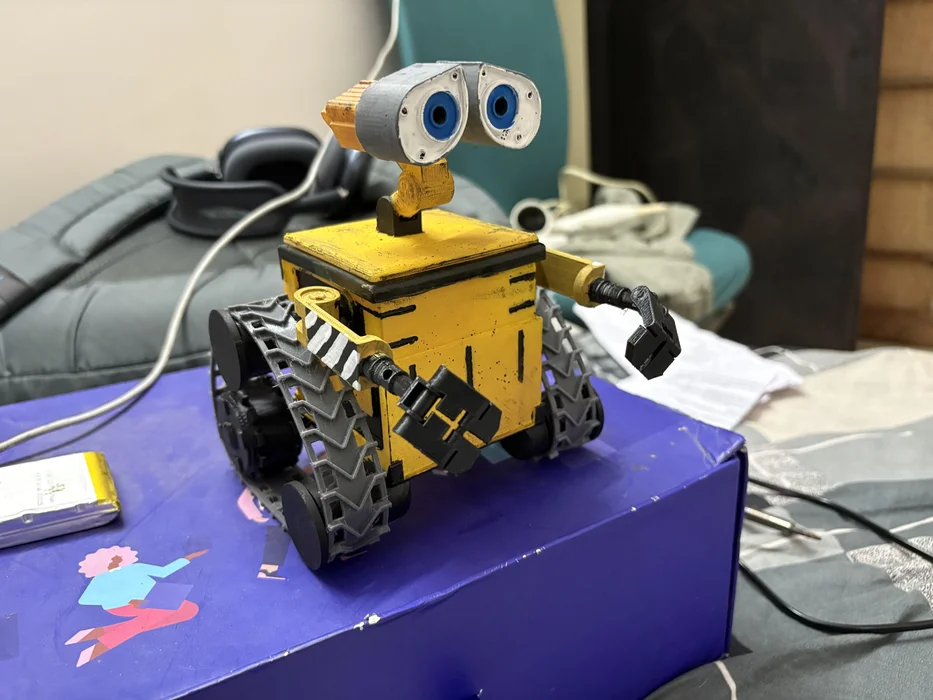
Step 4: Conclusion
And with that our Wall-E is ready to be driven around, here are a few clips of my Wall-E exploring the world! Feel free to add your suggestions and the modified versions of Wall-E you make. I tried to keep it as simple and straightforward as possible, however I would love to add some more functionalities to it, like giving it it’s own voice and maybe connecting it to a raspberry pi 3, so that I can use and build something like the GPTARS.